Looking to give your walls a fresh new look? Consider plastering!
This article covers what plastering is, its importance, and the necessary tools.
We will guide you through wall preparation, plaster mixing, and flawless application. Whether you’re a DIY enthusiast or a professional, mastering the art of plastering is made easy with this article.
What Is Plastering?
Plastering is the process of applying a smooth, durable, and attractive surface to walls or ceilings. It involves the careful application of a mixture, known as plaster, to create a finished coat that enhances the aesthetics and integrity of the underlying surface.
Plastering plays a crucial role in both construction and renovation projects, providing a protective layer that improves the overall look and feel of a space. One of the key techniques involved in plastering is the meticulous mixing of plaster to achieve the right consistency before application. This mixture is then skilfully applied to the surface, utilising various tools and methods to ensure an even and seamless finish. The benefits of plastering include increased durability, sound insulation, and the ability to cover imperfections in the substrate, resulting in a polished and refined appearance.
Explore in-depth: What Is Plaster Skimming
Why Is Plastering Important?
Rendering plays a crucial role in providing a polished and professional finish to walls, contributing to the overall aesthetics and longevity of a structure. Whether it’s interior or exterior walls, proper rendering ensures a smooth and even surface that can be painted or left as is for a decorative touch.
One of the primary benefits of rendering is its ability to enhance the structural integrity of walls, protecting them from moisture, cracks, and other damages over time. A well-executed rendering job can significantly improve the acoustics and thermal insulation of a building, creating a more comfortable indoor environment. The quality of the rendering work directly impacts the ease of maintenance and durability of the walls, reducing the need for frequent repairs and replacements.
What Tools Do You Need For Plastering?
Plastering requires several essential tools to achieve a professional finish. These tools include a trowel, plastering hawk, plastering float, and a bucket, all of which are vital for mixing, applying, and smoothing the plaster on walls or ceilings.
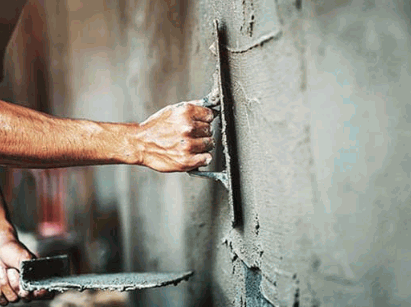
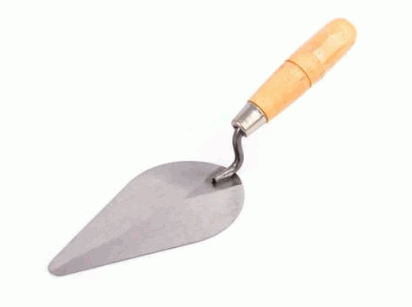
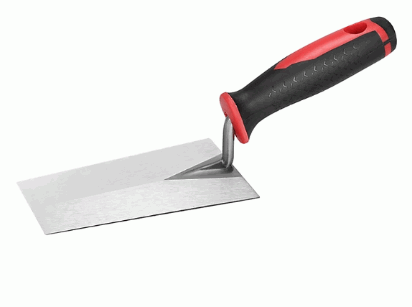
Trowel
A trowel is a handheld tool with a flat, pointed blade used for applying and smoothing plaster on surfaces. It plays a crucial role in achieving an even and uniform coat of plaster, ensuring a professional finish that is both visually appealing and structurally sound.
This versatile tool allows plasterers to adjust the thickness of the application, resulting in a smooth and seamless surface. The angle and pressure applied by the plasterer determine the texture and finish of the final surface. Its ergonomic design enables precise control over the spread of the plaster, making it an essential instrument for craftsmen seeking perfection in their work.
Whether working on walls, ceilings, or other surfaces, the trowel’s ability to create a flawless and lump-free finish is unmatched. The right techniques, combined with the right trowel, can transform rough walls into sleek and polished masterpieces.
Plastering Hawk
A plastering hawk is a tool that holds a supply of mixed plaster, allowing the plasterer to easily access and apply the material while working on walls or ceilings. It facilitates a smooth and efficient plastering process by providing a convenient platform for mixing and carrying the plaster.
The design of a plastering hawk typically consists of a flat surface, usually made of aluminium or magnesium, attached to a handle for easy maneuverability. This flat surface serves as the area where the plaster mix is placed and manipulated. By using a hawk, plasterers can control the amount and consistency of the plaster they are working with, resulting in more consistent and even application.
- A plastering hawk enables the plasterer to have better control and precision when applying plaster to the desired areas, ensuring a high-quality finish.
- The hawk minimises the strain on the wrist and arm muscles, as it provides a stable base for holding and manipulating the plaster mix during the application.
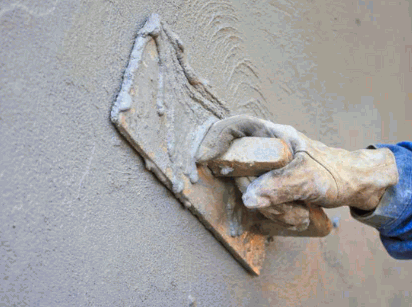
Plastering Float
A plastering float is a tool designed to smooth and level freshly applied plaster on walls or ceilings. It helps achieve a uniform surface finish by removing imperfections and ensuring that the plaster is evenly distributed across the area being worked on.
The primary function of a plastering float in the plastering process is to provide a smooth and even surface for the plaster to adhere to. By using a plastering float, the user can effectively apply and manipulate the plaster, ensuring that it is spread evenly and without any lumps or bumps. The float helps in applying the finishing touches to the plaster surface, allowing for a professional-looking result. It plays a crucial role in achieving a high-quality finish by aiding in the proper application of the plaster and ensuring that the surface is ready for further treatments.
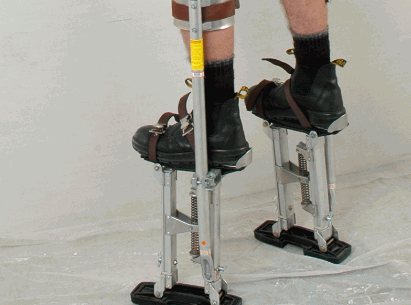
Plasterers’ Stilts
Plasterers’ stilts are specialised tools that elevate the plasterer above the ground, allowing them to work on ceilings or high walls with ease and efficiency. These adjustable stilts provide stability and mobility during the plastering process, enabling precise application and finishing.
Moreover,
- Plasterers’ stilts offer a safer alternative to ladders by distributing the weight evenly, reducing the risk of accidents and strain on the plasterer’s body.
- This elevated position also grants better visibility and access to hard-to-reach areas, resulting in a more uniform and professional finish.
- The adjustable height feature of these stilts caters to varying project requirements, ensuring adaptability and comfort for the user throughout long hours of work.
- The time-saving aspect of using these stilts cannot be overlooked, as they expedite the plastering process by eliminating the need for constant repositioning and ladder adjustments.
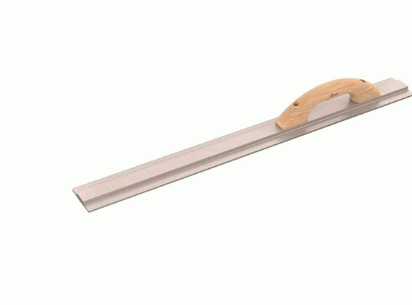
Plastering Darby
A plastering darby is a long, straight tool used to level and smooth large sections of plastered surfaces. It ensures uniformity in surface flatness and eliminates any irregularities or imperfections that may arise during the plastering process.
Plastering darbies are typically made of durable materials like aluminium or wood, making them sturdy and reliable for the job. One crucial aspect of using a darby is its ability to create an even surface that is essential for the proper adhesion of subsequent layers of plaster or finishing materials. By running the darby over the fresh plaster, builders, and contractors can ensure a consistent level and smoothness across the entire surface, ultimately leading to a professional finish.
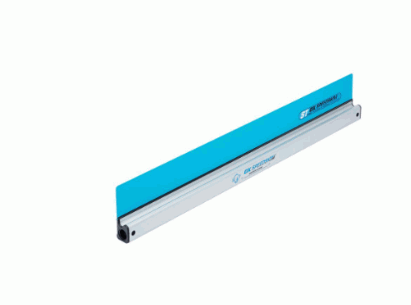
Plasterer’s Rule
A plasterer’s rule is a straight-edge tool used to ensure the evenness and levelness of plastered surfaces. It assists in maintaining consistent thickness and smoothness across walls or ceilings, resulting in a professional finish with minimal deviations.
It plays a crucial role in the plastering process by allowing the plasterer to check if the surface is flat and uniform with precision. The plasterer’s rule acts as a guide for applying the correct amount of plaster, guaranteeing the desired thickness. By adhering to the measurements provided by the rule, the plasterer can achieve the required quality standards set for the project. This tool enhances efficiency and accuracy, contributing to the overall durability and aesthetics of the plastered surface.
Bucket Trowel
A bucket trowel is a specialised tool used for scooping and transferring plaster from a mixing bucket to the application area. It facilitates the efficient handling and distribution of plaster, ensuring a steady supply of material for the plastering process.
The design of a bucket trowel allows plasterers to easily access and manoeuvre the material, ensuring a smooth and even application on walls or ceilings. By providing a controlled way of transferring plaster, it helps in minimising wastage and mess during the plastering process. The sharp edge of the trowel enables precise cutting and shaping of plaster, allowing for accurate placement and finishing touches. The use of a bucket trowel enhances workflow efficiency and contributes to achieving high-quality plastering results.
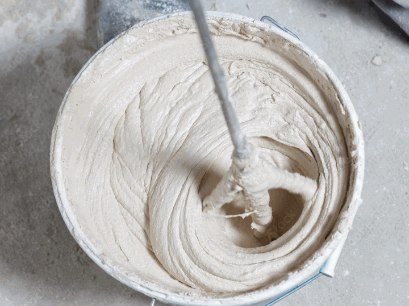
Mixing Bucket
A mixing bucket is an essential container used for combining plaster with water to create the desired consistency for application. It serves as a convenient vessel for mixing and preparing plaster mixtures before the actual application process begins.
- One of the key roles of a mixing bucket in the plastering process is to ensure that the plaster mix is thoroughly and evenly blended with water. This is vital in achieving the right texture and viscosity for smooth application.
- The mixing bucket allows for adjustments to be made to the consistency of the plaster mix by gradually adding water or plaster as needed, ensuring that the mixture is neither too thick nor too runny.
- By using a mixing bucket, plasterers can consistently produce uniform plaster mixtures, reducing the risk of inconsistencies in the finished plaster surface.
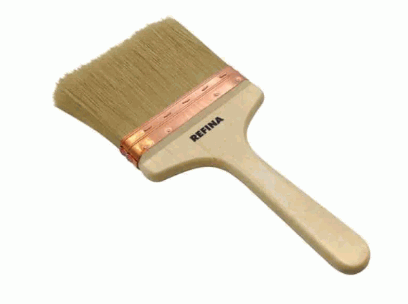
Plasterer’s Brush
A plasterer’s brush is a tool used for cleaning and smoothing plastered surfaces, removing dust, debris, and imperfections to enhance the quality and appearance of the finish. It ensures that the surface is clean and ready for subsequent coats or finishing touches.
In the plastering process, a plasterer’s brush plays a vital role in preparing the surface for further treatment by creating a smooth and even base. By effectively removing any unwanted particles, the brush ensures that the surface is free from irregularities and contaminants that could affect the final result.
Using a plasterer’s brush facilitates quality control during the application of plaster, allowing the tradesperson to inspect the surface thoroughly and make necessary adjustments to achieve a flawless finish.
How To Prepare The Wall For Plastering?
Preparing the wall for plastering is a critical step that ensures a successful and long-lasting finish. This process involves cleaning the wall, repairing any damages, and applying a bonding agent to promote adhesion between the wall surface and the plaster.
Before applying plaster, it’s essential to clean the wall thoroughly to remove any dust, debris, or grease that could hinder the bonding process. Next, inspect the wall for cracks, holes, or uneven surfaces that need repair to ensure a smooth and uniform finish. Repairing these imperfections will not only enhance the aesthetics but also prevent future issues like cracks in the plaster.
Once the repairs are complete, applying a primer or bonding agent becomes crucial to create a strong bond between the wall and the plaster, enhancing durability and longevity.
Clean The Wall
Cleaning the wall is the first step in wall preparation for plastering. It involves removing dirt, dust, grease, and any other contaminants that may hinder the adhesion of the plaster. A clean wall provides a suitable surface for the plaster to adhere to effectively.
One crucial aspect of wall cleaning is ensuring that all loose particles, such as peeling paint or old wallpaper, are thoroughly removed to prevent any issues with the plaster application. Using a combination of scraping tools, like putty knives and wire brushes, can help in this process.
To achieve a clean and debris-free surface, washing the wall with a solution of water and trisodium phosphate (TSP) is often recommended. TSP helps to degrease and remove stubborn stains, preparing the wall for the plastering phase.
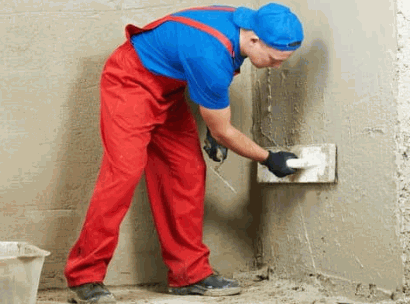
Repair Any Damages
Repairing any damage on the wall is essential to create a smooth and uniform surface for plastering. This step involves fixing cracks, holes, or imperfections that could affect the final finish of the plaster.
Before starting the repair process, it is crucial to assess the extent of the wall damage. Common issues include water damage, cracks due to structural movements, or holes from wear and tear.
- To repair cracks, a joint compound can be used to fill in the gaps, ensuring a sturdy foundation for the plaster.
- Holes can be patched up with mesh tape and a patching compound to prevent them from reappearing after plastering.
- It’s important to address any underlying structural flaws to prevent future damage and ensure a long-lasting plaster finish.
By properly addressing these issues, you lay the groundwork for a successful plastering job, resulting in a seamless and durable wall surface.
Apply A Bonding Agent
Applying a bonding agent is a crucial step in wall plastering preparation, as it enhances the adhesion between the wall surface and the plaster material. The bonding agent promotes a strong bond and prevents the plaster from delaminating or peeling over time.
By creating a secure foundation, the bonding agent plays a pivotal role in ensuring the longevity and durability of the plastered surface. Not only does it improve adhesion, but it also enhances surface integrity by minimising the risk of cracks or detachment. This crucial step ultimately leads to a smoother and more uniform finish, elevating the overall quality of the plastered wall. Wall plastering projects benefit significantly from the application of a bonding agent, as it serves as the backbone for a successful and lasting plaster installation.
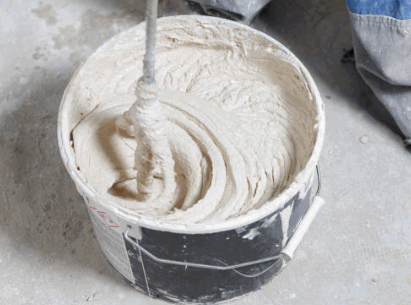
How To Mix Plaster?
Mixing plaster is a fundamental aspect of the plastering process that requires precision and consistency. To mix plaster, combine the plaster powder with water in a mixing bucket, gradually incorporating the powder into the water until a smooth and workable consistency is achieved.
When starting the mixing process, it’s crucial to use the correct proportion of plaster to water to ensure the plaster sets properly. Typically, a common ratio is 2 parts plaster to 1 part water, but this may vary depending on the type of plaster being used.
Once you’ve added the plaster powder to the water, avoid adding all the powder at once. Instead, slowly sprinkle the powder into the water while simultaneously mixing to prevent lumps from forming.
Consistency is key. The plaster mixture should have a creamy texture without any lumps or dry spots. If the mixture is too thick, add small amounts of water gradually until the desired consistency is reached.
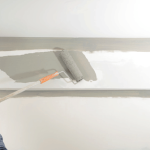
How To Apply Plaster On The Wall?
Applying plaster on the wall involves several key steps to ensure a professional and durable finish. The process includes applying the first coat of plaster, smoothing out the surface, applying the second coat for additional coverage, and adding finishing touches for a polished appearance.
- Starting with the application of the first coat, it is crucial to mix the plaster to the right consistency for easy spreading.
- Smooth surface preparation is essential before moving on to the next step.
- Once the first coat is applied evenly, allow it to dry completely to achieve a strong bond.
- Then, applying the second coat serves to enhance the durability of the plaster layer.
- To achieve a flawless finish, carefully sand the surface and make any necessary touch-ups before the final finishing touches are added.
Apply The First Coat
The first coat of plaster is the initial layer applied to the wall surface to create a base for the subsequent layers. It is essential to apply the first coat evenly and smoothly, ensuring proper adhesion and coverage across the designated area.
One key technique for achieving uniform coverage when applying the first coat of plaster is using a hawk and trowel to spread the mixture evenly. Applying the plaster in a crisscross pattern can help ensure that all areas are covered. Maintaining a consistent thickness throughout the surface is crucial to prevent uneven drying and cracking.
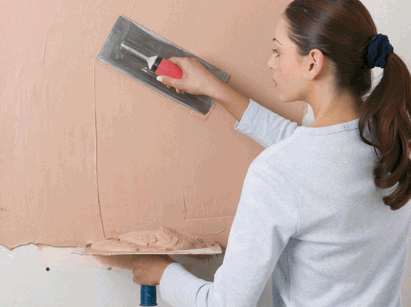
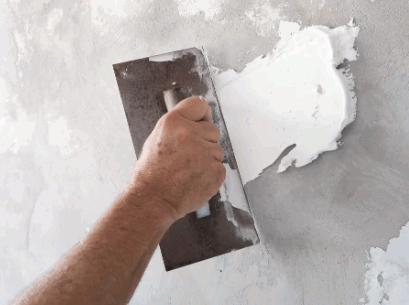
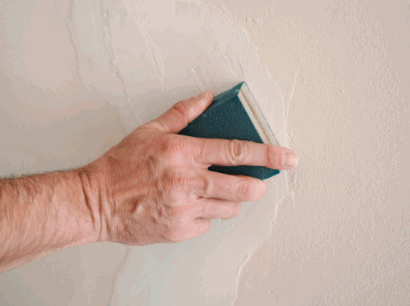
Smooth Out The Surface
Smoothing out the surface of the plaster is a crucial step in achieving a polished and even finish. Using tools like a plastering float or trowel, work to level and smoothen the applied plaster, removing any bumps or imperfections for a seamless surface.
Ensuring a smooth surface not only enhances the aesthetic appeal of the walls but also provides a solid foundation for any subsequent decorations or coatings. One effective technique for achieving a flawless finish involves using long, sweeping strokes with the plastering tools. It is important to maintain consistent pressure and angle to prevent uneven ridges or lines. Regularly clean and dampen the tools during the plastering process to prevent the material from sticking excessively. By following these best practices, you can streamline the plastering process and achieve a uniform, high-quality surface.
Apply The Second Coat
Applying the second coat of plaster is a critical step to build up the thickness and coverage of the finish. This coat should be applied after the first coat has dried sufficiently, allowing for a smooth and consistent application that enhances the overall durability and aesthetics of the surface.
When applying the second coat of plaster, it is important to carefully assess the thickness of the coat to achieve the desired result. A uniform application is crucial for a professional finish, ensuring that the surface is adequately covered without being excessively thick. The drying time between the first and second coats plays a key role in the final outcome. Allowing ample time for the first coat to dry completely before applying the second layer is essential to prevent issues such as blistering or poor adhesion.
Finishing Touches
Adding finishing touches to the plastered surface is the final step in the plastering process that enhances the overall appearance and durability of the finish.
These finishing touches are crucial for achieving a smooth and professional look. One common technique is to carefully sand the dried plaster to remove any rough edges or bumps. Applying a final coat of plaster and skillfully blending it with the existing surface can create a seamless finish. Specialised tools such as trowels, sandpapers, and texturing brushes are essential for achieving desired results.